Hello, everyone reading this. Today, I am going to demystify the difficulty that is often present when you are trying to manually set up email accounts, especially a custom mailbox for business. In addition, those having a non-android or iOS device will benefit from this piece. Will be more useful for those having older mobile phones. Apparently, newer phones(post-2011) come with automated email configuration settings unlike what is obtainable when smartphones were introduced in early 2000.

What is Manual Email Configuration?
Similar to manual internet profile/APN configuration, we can call manual email setup a situation whereby you need additional settings before you can log in to your mobile phone email app. Traditionally, with auto-email configuration, all you need is to simply enter your email address(username) and password and you will be logged in. This is not the case when you are dealing with manual emails.
When am I required to enter my Advance Email settings Manually?
Basically, there are various scenarios that will warrant you to use a custom/manual email setup. some of these scenarios are listed below:
- If or when you want to use your custom email address for your business. This will give you a better presence and identity, which will be difficult to steal. For example, my site’s name is lemmymorgan.com, and my official email is info @ lemmymorgan.com. Merely looking at it, it is an undeniable fact that I own that email, and I am liable. However, to be able to use that email with any email app(apart from that of my WebHost) I must enter some settings manually.
- Secondly, if you own a phone that doesn’t support your mail provider automatically, you must manually enter some details.
Benefits of Using an Email that Requires Manual/Custom Configurations
As of 2012, many phones now support most email clients automatically. It has even gotten to a point whereby you will be logged in if you enter just your username and password of your custom email into the “outlook app” for Android or iOS. I always use the Outlook app for all my emails. I am so used to it because it has a simple user interface. Let me give you some of the benefits of using your custom email, especially for your business/office.
- It adds an extra layer of security to your mailbox. You can configure everything yourself and you determine your own fate to a large extent.
- A business custom mailbox will increase your credibility and integrity online. It simply means you are telling the world that you are ready for business.
- It makes your brand to be unique. You will be accorded due respect and clients would be more than willing to transact with you as opposed to you using a freed domain like yahoo.com, gmail.com, icloud.com, and so on.
- Misrepresentation and identity theft are at their minimum with custom email addresses. for example, if I use “lemmymorgan@gmail.com”, a hacker can use “lemymorgan@gmail.com” or lemmymorgen@gmail.com or l3mmymorgan@gmail.com and use it to deceive unsuspecting clients. Compare this with my current custom email: info @lemmymorgan.com. It is especially very difficult to manipulate this. The reason is that anything you change in the letters will result in an undeliverable email because I own my server. I must approve every alias of the email used with lemmymorgan.com before the emails will deliver, as you will soon find out below:
Disadvantages of Manual Emails
- You mustn’t be careless with your information otherwise, you can lose all your emails in the process, especially if you are hacked.
- If you use a shared hosting service, your host provider may limit the number of email addresses you can open.
- When your host’s server is offline, your mailbox will also be offline. Comparatively, free email service providers such as Gmail, yahoo, live, etc. have very strong servers.
- Finally, custom emails cost money because it is meant for business/official purposes. Thus, Gsuite(which is Google’s custom email service for business) costs around $6 per month for one user. Office 365, which is Microsoft’s premium email service, costs around $9.99 per month or $99.9 per year. Similarly, yahoo business mail costs $3.15 for the cheapest plan. Learn more about Office 365 to Office 365 Migration and SharePoint Data Migration.
Requirements for Setting Up Your Mailbox Manually on Any Phone
The first and foremost requirement of owning and managing a custom mailbox is the fact that you must have a domain name and a host. Therefore, you first need to talk to your hosting provider to help you create a mailbox on your account before you can use it with any other app.
If you know your way around your host’s Cpanel as I do, you can easily set up mailboxes on your hosting account without the help of your host.
Secondly, For every custom mail client, you will be provided additional settings apart from your usual email address and password. All the settings required for successfully setting up and mailbox manually have been discussed below:
| Username: | your full email address here( e.g:info@lemmymorganreaders.com) |
| Password: | Use the email account’s password. |
| Incoming Server: | this will be provider by your email host( E.G mine is: mail.lemmymorganreaders.com)
|
| Outgoing Server: | mail.lemmymorganreaders.com(note: if your mail provider gives you an outgoing server that is different from the incoming server, use it as is.
|
IMAP, POP3, and SMTP require authentication. | |
How to Configure Google G-Suite or Add any Custom Email to the Gmail Android or iOS App
- First off, download the Gmail app for android(In most cases, Gmail is preinstalled by default, and you can’t even uninstall it) or iOS and open it.
- Now, select “Add another email address” from Settings. If you have a Gsuite custom email powered by Google, you can choose “Google,” then enter your email and password and proceed. However, if you have a custom email from another hosting company, you will need to select the “other” option, which will enable you to enter your settings manually.

- Next, you will see an option to add your email address. Enter your email(i.e username@domain.com)
- in the box provided, select manual setup from the bottom left corner of the window. See the image below:

- Choose ‘Next’ to begin the ‘Setup Wizard’.
- Select ‘IMAP4’ then ‘Next’.

- At ‘Incoming Mail Server’, enter the mail server given to you by your email service provider. (e.g: mail.username@yourdomain.com)

- At ‘Outgoing Mail Server’ enter the applicable mail server setting and your password.
- At ‘Account Mailbox Name’, enter Google! Mail (i.e. your mailbox is set up).
- Finally, enter your name and your account name to finalize the setup. Your account name can surely be anything, but I advise you to use a name that people know you with as your name,


How to Setup Gmail Manually on Older Phones
(B) Google! Mail:
1. Select ‘Messaging’ > ‘Options’ > Settings > ‘E-Mail’ > ‘Mailbox’.
2. Select ‘Options’ then ‘New Mailbox’.
3. Select ‘Start’ to begin the ‘Setup Wizard’.
4. Select ‘IMAP4’ then ‘Next’.
5. At ‘Email Address’ enter full email address(i.e username@gmail.com), then ‘next’.
6. At ‘Incoming Mail Server’, enter ‘imap.gmail.com’ then ‘next’.
7. At ‘Outgoing Mail Server’ enter Smtp.gmail.com then next.
9. At ‘Access Point In Use’ select ‘Ask Always’ ‘then next’.
10. At ‘Account Mailbox Name’, enter Google! Mail (i.e your mailbox is set up).
11. Now enter your ‘Google! Mail’ > ‘Connection Settings’ and select ‘Incoming e-mail’.
12. At ‘My Email Address’ enter your username@gmail.com. At ‘Password’ enter your Gmail password.
13. At ‘Security(port)’, select ‘SSL/TLS’. At ‘Port’, select ‘User Defined’ and enter ‘993’ then select back.
14. select ‘Outgoing e-mail’.
15. At ‘My Email Address’ enter your username@gmail.com. At ‘Password’ enter your Gmail password.
16. At ‘Security(port)’, select ‘StartTLS’. At ‘Port’, select ‘User Defined’ and enter ‘587’ then select back.
17. Select ‘User Settings’ and enter username@gmail.com.
18. You are done.
19. To check your email, press ‘Messaging’ > ‘Google! Mail’ > ‘Connect’ then wait
How to Configure Microsoft Office 365 or Add any Custom Email to the Microsoft Outlook Android or iOS App
- First off, download the Microsoft outlook app for android or iOS and open it.
- On the top left corner, you will see 3 parallel lines, click on it and it will open additional options.
- Next, select the “setting icon” from the bottom left corner to access the mail setup. see image below:

- Now, select “Add account”>>”Add an email account”. See the picture below for clarification.

- Select either “IMAP or POP3” the list of email account types that pop up. However, If you are a Microsoft Office, 365 subscriber, simply log in with only your email and password and you will be okay.

- In the first three rows of the next page, you will see an option to add “your email address”. Enter your email(i.e. username@domain.com), “Your Display Name,” and “your description.”
- Now, scroll down to “IMAP Incoming Mail Server” and enter your server the way it is as provided by your host. an example is “mail.lemmyreaders.com” See the image below:

- Make sure the advanced settings option is checked.
- It is time to enter the values for the “SMTP Outgoing Mail Server.” 3 things are needed here: the mail server/hostname given to you by your email service provider. (e.g.: mail.username@yourdomain.com), the username which is the same as your email, and the password to your email address.

- Congratulations, you have successfully added your custom email to your Outlook email app. You can now refresh your inbox to allow the mail to propagate.


How to Configure or Add any Custom Email to the iOS/Apple Mail App, Samsung Email, or other builtin Email Client
I will be using the Apple default mail app as my case study. However, you can adopt the same setup for other default mail clients such as Samsung email and so on.
- Launch iPhone/iPad mail app from your phone. This is preinstalled on every iOS device. It is also available on Macbook computers. If, for any reason, it is missing, you can redownload it from the app store. The same applies to Samsung mail.

- Next, select “other” on the next page
- Now, select “Add another email address” from Settings. If you have a Gsuite custom email powered by Google, you can select “Google,” then enter your email and password and proceed. However, if you have a custom email from another hosting company, you must select the “other” option, enabling you to enter your settings manually.
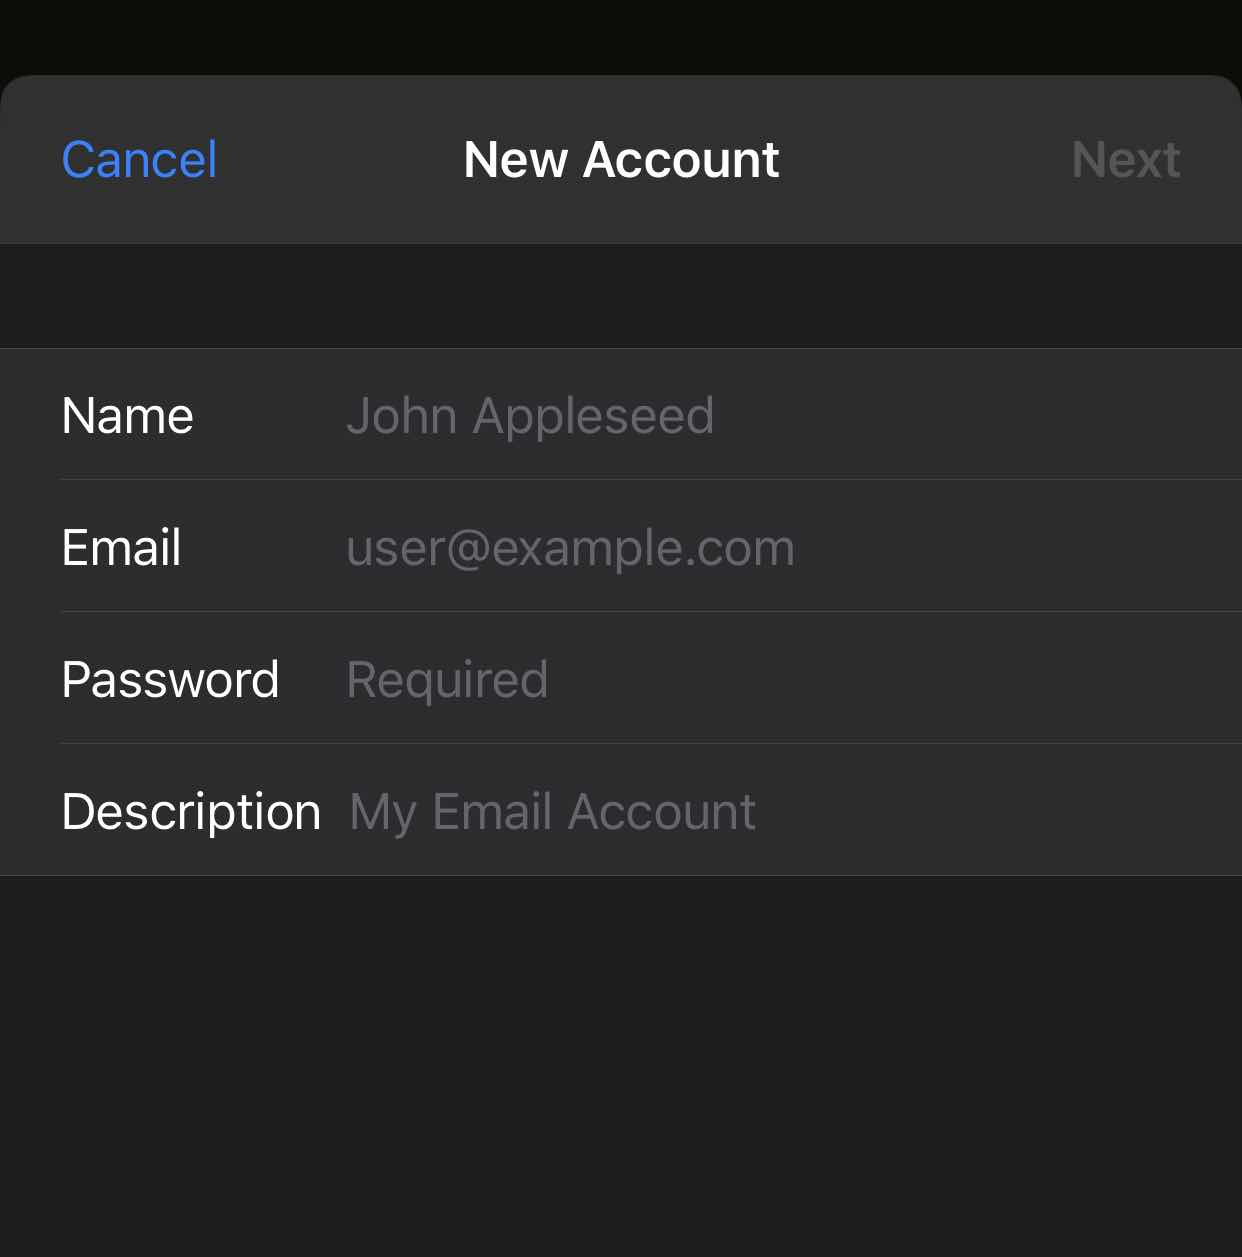
- At this point, you will be required to fill in your “Name”(e.g. any name), “Email”(must be your full custom email address), “Password”, and “Description”.

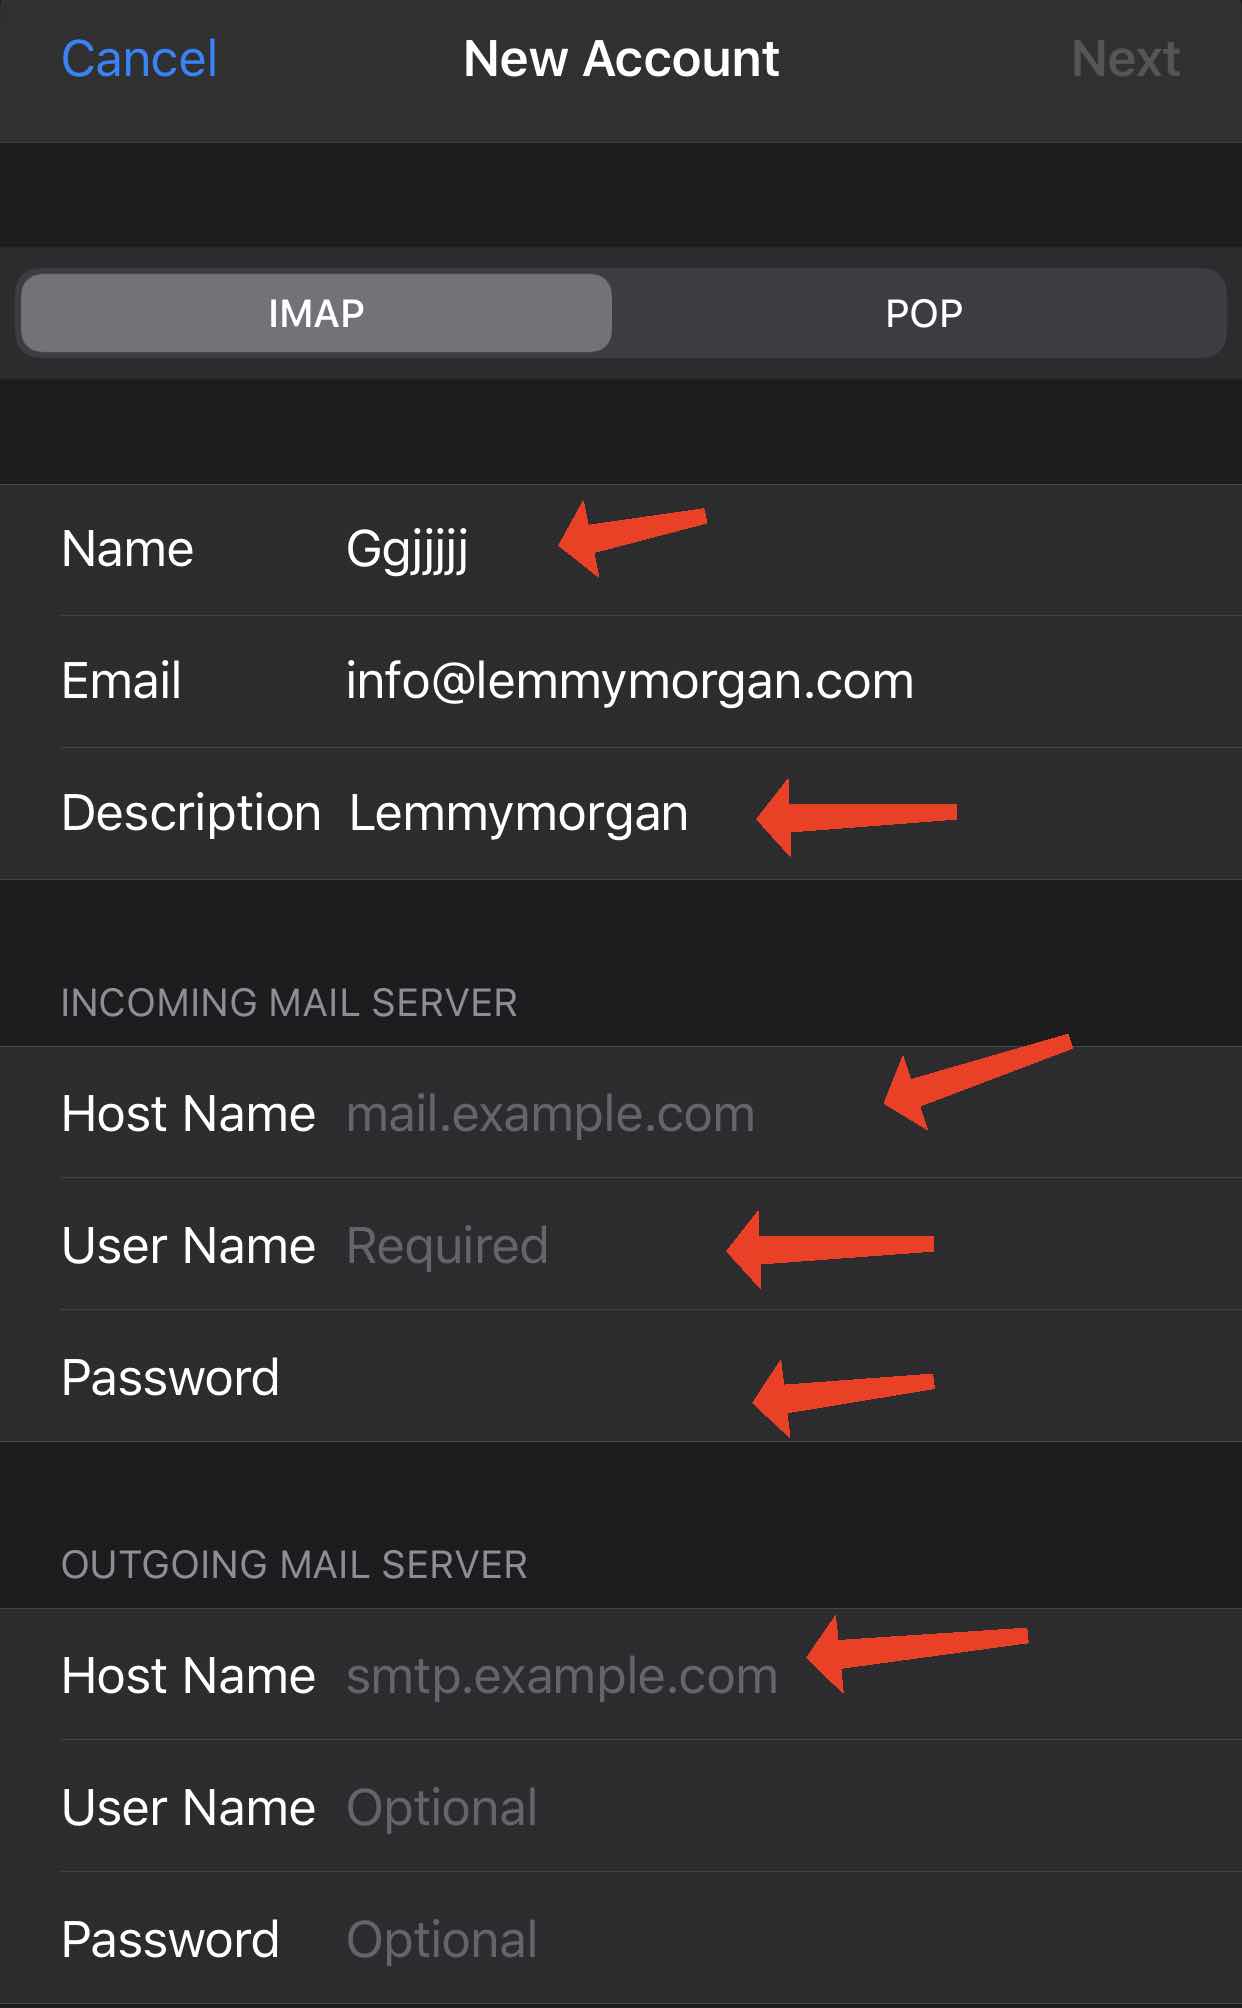
- On the next page, you will see where you will enter your “Incoming mail server” URL as well as your “Outgoing Mail Server,” as shown in the picture below:

- Once you entered the required details correctly, your mailbox will be ready to use.

How To Set Up Email Configuration Manually On Older Smartphones With Yahoo mail
1. Select ‘Messaging’ > ‘Options’ > Settings > ‘E-Mail’ > ‘Mailbox’.
2. Select ‘Options’ then ‘New Mailbox’.
3. Select ‘Start’ to begin the ‘Setup Wizard’.
4. Select ‘IMAP4’ then ‘Next’.
5. At ‘Email Address’ enter full email address(i.e username@yahoo.com) then ‘next’.
6. At ‘Incoming Mail Server’, enter ‘imap.n.mail.yahoo.com’ then ‘next’.
7. At ‘Outgoing Mail Server enter Smtp.mobile.mail.yahoo.com then next.
9. At ‘Access Point In Use’ select ‘Ask Always’ ‘next’.
10. At ‘Account Mailbox Name’, enter Yahoo! Mail (i.e your mailbox is set up).
11. Now enter your ‘Yahoo! Mail’ > ‘Connection Settings’ and select ‘Incoming e-mail’.
12. At ‘My Email Address’ enter your username@yahoo.com. At ‘Password’ enter your yahoo mail password.
13. At ‘Security(port)’, select ‘SSL/TLS’. At ‘Port’, select ‘User Defined’ and enter ‘143’ then select back.
14. select ‘Outgoing e-mail’.
15. At ‘My Email Address’ enter your username@yahoo.com. At ‘Password’ enter your yahoo mail password.
16. At ‘Security(port)’, select ‘SSL/TLS’. At ‘Port’, select ‘User Defined’ and enter ’25’ then select back.
17. Select ‘User Settings’ and enter username@yahoo.com.
18. You are done.
19. To check your email, press ‘Messaging’ > ‘Google! Mail’ > ‘Connect’ then wait.
20. If this message pop up ‘This site has sent an untrusted certificate’ press ‘Options’ >
How can i do this on itel 6910?
hello sir,the setti isn’t working on my nokia E7 what do i do
well done but the yahoo setting did not work for me only the gmail work, i dont know if there is a problem with the yahoo setting am using nokia e61
there is no error but you may retry later maybe their server was down